Introduction
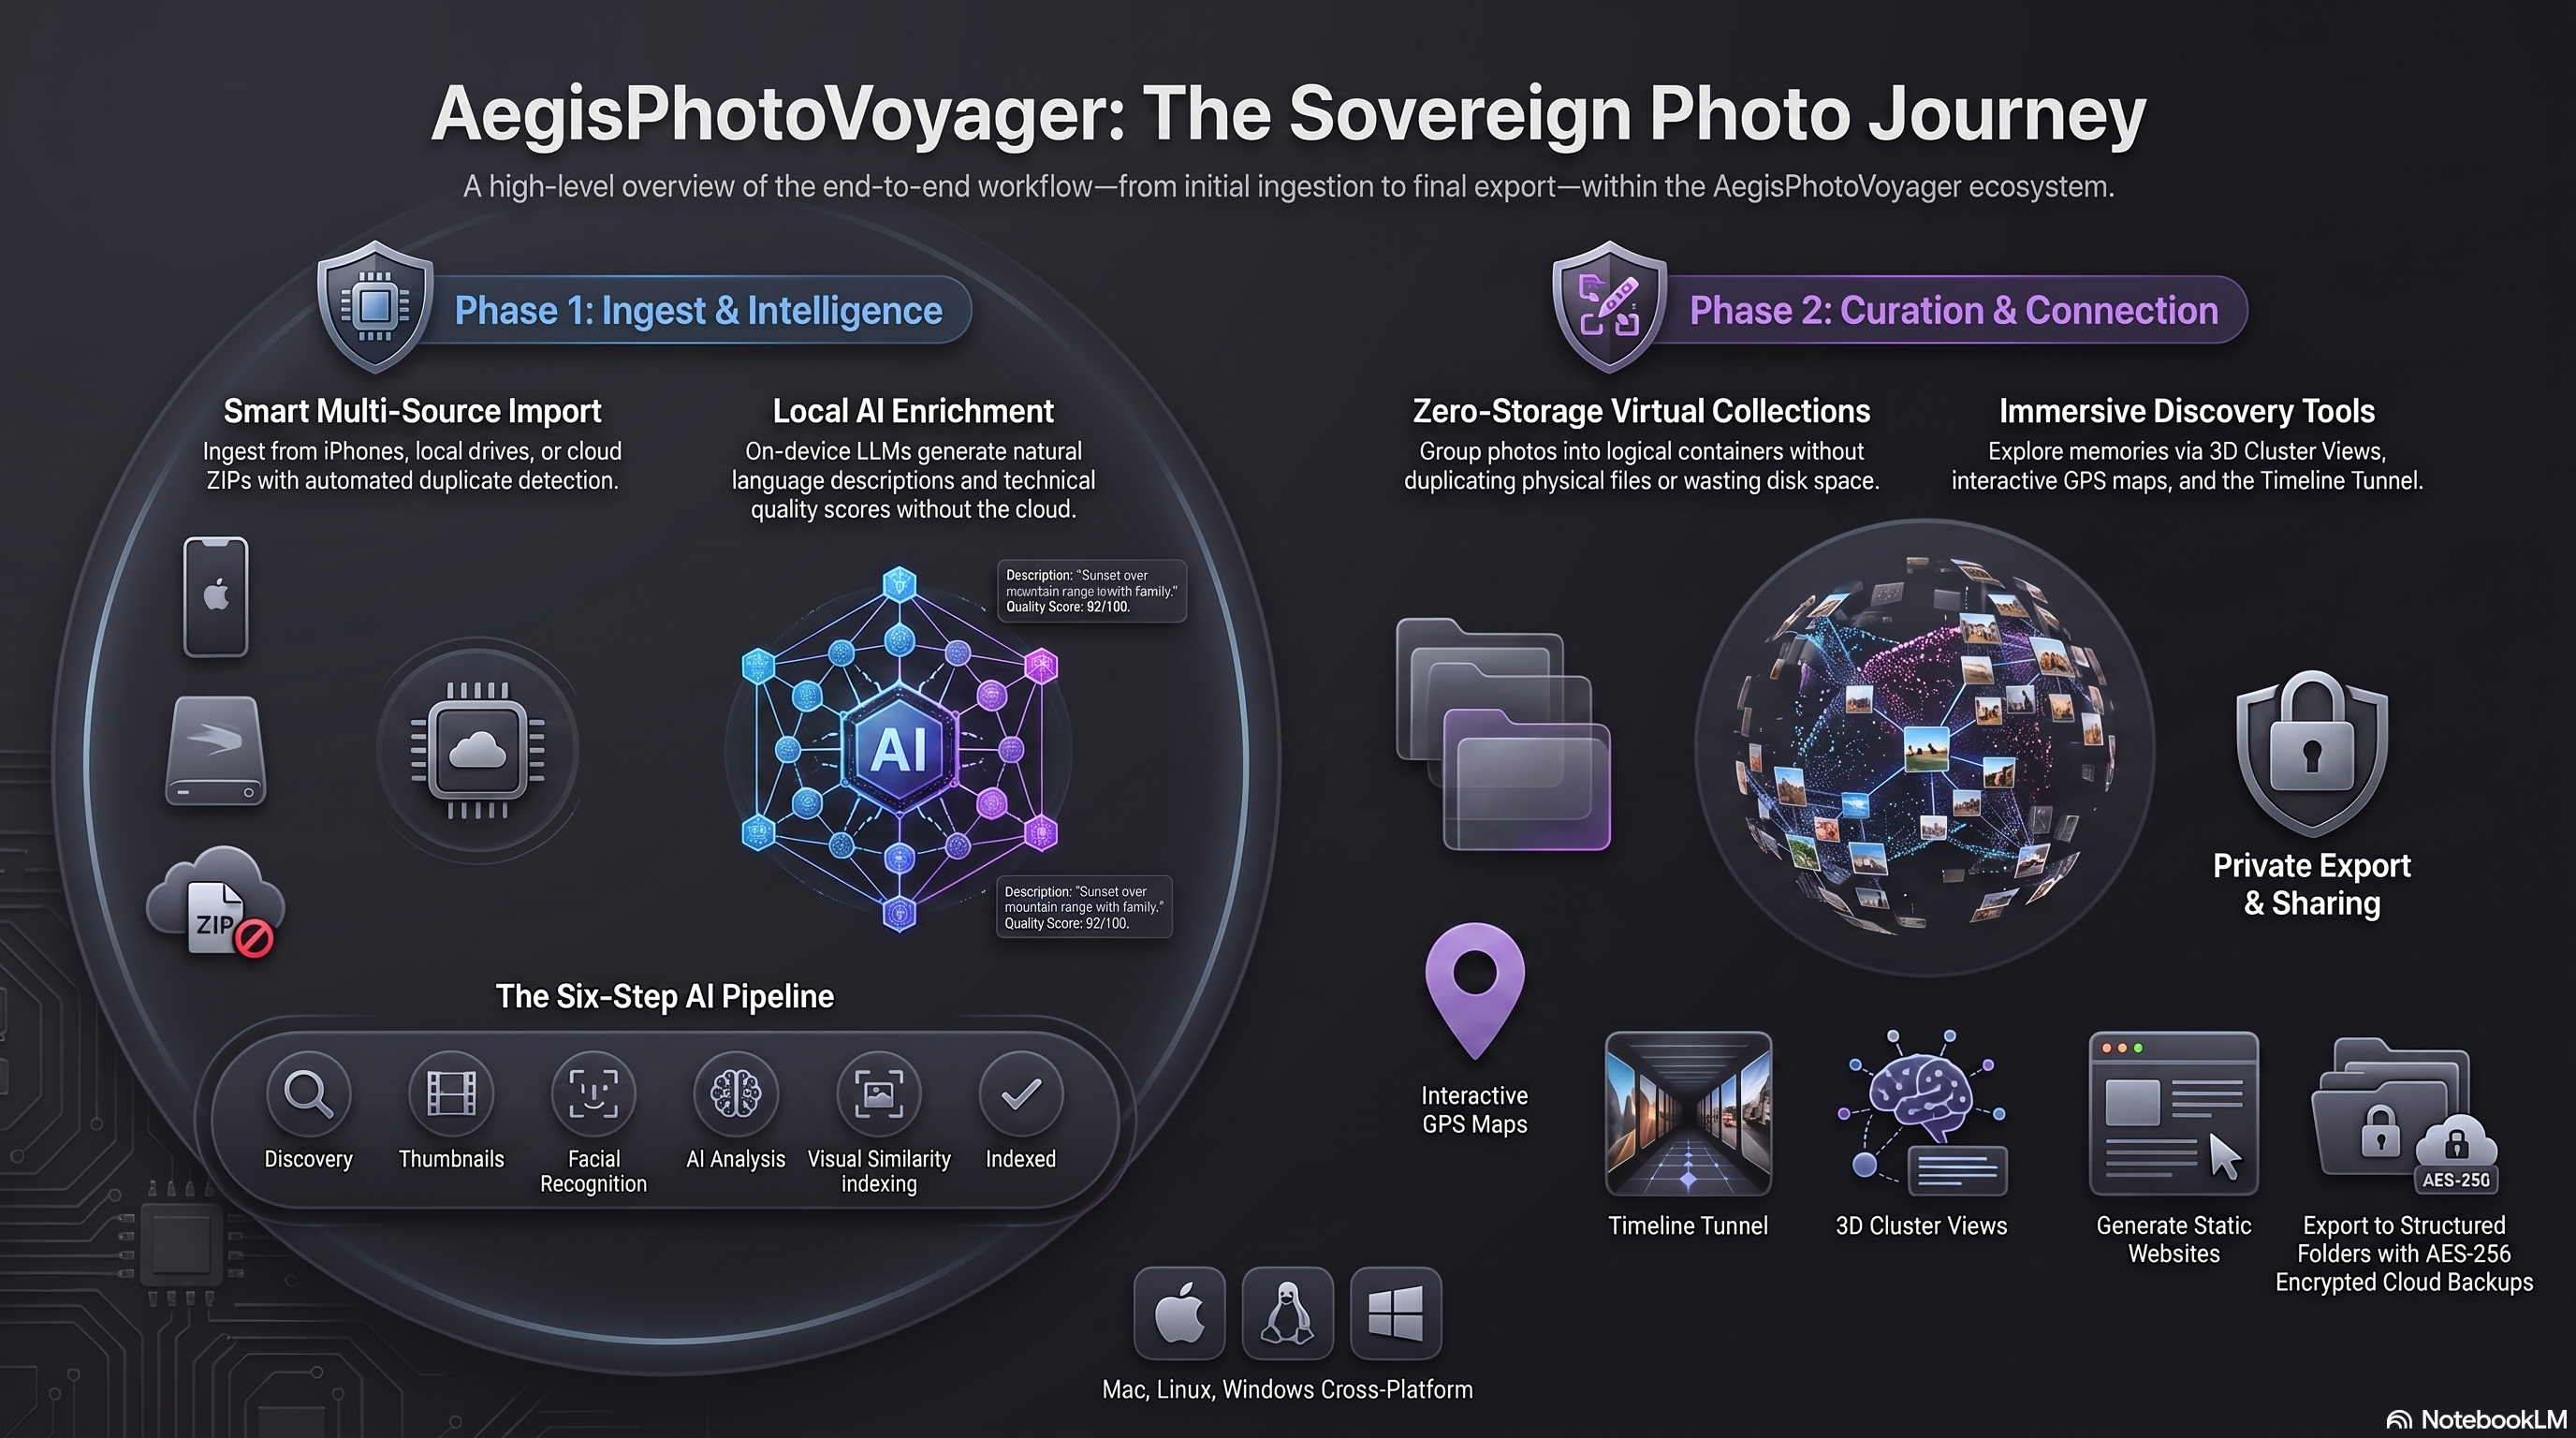
Aegis Photo Voyager is a premium, local-first photo management suite built for photographers and enthusiasts who need to organize, explore, and enrich massive image libraries — without surrendering privacy to a cloud service or paying a subscription.
It is designed to comfortably handle libraries of 100,000–300,000+ photos and videos, maintaining a fluid, responsive interface even while background AI processes run simultaneously.
Core Philosophy
| Principle | What It Means in Practice |
|---|---|
| Privacy First | Zero external network calls. Every AI inference, every search, every face scan runs 100% on your own machine. |
| Chronological Anchoring | Photos are anchored to when they were taken, not imported. EXIF, IPTC, filename patterns, and filesystem timestamps are all mined to find the true capture moment. |
| Non-Blocking Architecture | The UI never freezes. All heavy work — discovery, AI analysis, face scanning, export — runs in isolated background processes. |
| Local Intelligence | AI is a tool for you, not a product to extract data from you. All descriptions, tags, face clusters, and semantic search live in a local SQLite database you own. |
Feature Highlights
Library & Navigation
High-performance grid, Timeline Rail, Map View, 3D Cluster View, Timeline Tunnel, People View.
Local AI Intelligence
AI metadata extraction, technical quality scoring, semantic search, visual similarity, face recognition — all offline.
Import, Export & Tools
Smart Importer (camera, iPhone, ZIP), Custom Exporter, Website Builder, AES-256 Cloud Backup, GPS Wizard.
Smart Filtering
Combine date, rating, camera, format, GPS, AI tags, and quality sliders in real-time indexed SQL queries.
Hardware & Software Requirements
Minimum Hardware
| Component | Minimum | Recommended |
|---|---|---|
| CPU | 4-core, 2.5 GHz | 8-core, 3.5 GHz+ |
| RAM | 12 GB | 16–32 GB |
| GPU | — (CPU-only mode works) | NVIDIA (CUDA) or Apple Silicon (Metal/MPS) |
| Storage | 10 GB free (app + models) | SSD with 50 GB+ free |
| Display | 1280 × 800 | 1920 × 1080+ |
GPU note: A GPU is not required but dramatically accelerates AI metadata extraction when using the Transformers backend. Ollama and LM Studio leverage Apple Silicon acceleration natively on macOS.
RAM by Library Size
| Library Size | Minimum RAM | Recommended RAM |
|---|---|---|
| Up to 20,000 photos | 12 GB | 16 GB |
| 20,000 – 100,000 photos | 16 GB | 32 GB |
| 100,000 – 300,000+ photos | 32 GB | 64 GB |
Operating System
- macOS 13 Ventura or later (Apple Silicon and Intel)
- Linux — Ubuntu 22.04 LTS / Debian 12 or later
- Windows 10 / 11 (64-bit)
On first launch, the application creates its data directory at ~/.AegisPhotoVoyager/ and initializes the photo database automatically.
1 Configure the AI Provider
Aegis Photo Voyager supports two AI functions, each configurable independently:
| Purpose | What It Does | Provider Options |
|---|---|---|
| Vision LLM | Describes photos, extracts tags, scores quality | Ollama, LM Studio, Transformers |
| Text Embeddings | Indexes descriptions for semantic search | Ollama, LM Studio, vLLM |
Open Settings → AI Engine tab (gear icon in the toolbar, or Ctrl+, / Cmd+,).
Choose Your Provider
Ollama Recommended
Runs quantized models as a local background server. Easiest path to get started, with full Apple Silicon support.
- Download and install Ollama. It starts automatically on port
11434. - In Settings → AI Engine, set Provider to
Ollamaand URL tohttp://localhost:11434. - Click Fetch Models, then select your vision model.
# Verify Ollama is running
curl http://localhost:11434/api/tags
LM Studio
User-friendly GUI for downloading GGUF models with an OpenAI-compatible local API.
- Download LM Studio and install a vision model via its model browser.
- Start the Local Server (default
http://localhost:1234/v1). - In Settings → AI Engine, set Provider to
LM Studioand enter the model identifier exactly.
Configure Text Embeddings (Semantic Search)
| Provider | URL Setting | Model to Enter |
|---|---|---|
| Ollama | http://localhost:11434 | nomic-embed-text |
| LM Studio | http://localhost:1234/v1 | text-embedding-nomic-embed-text-v1.5 |
The model name in the Semantic Search section must match the provider's naming convention exactly. Ollama uses short names like nomic-embed-text; LM Studio uses the full file-based name.
Not Sure Which Model to Use? Try the LLM Setup Wizard
Open Tools (left sidebar accordion) → LLM Setup Wizard. The wizard inspects your hardware (CPU cores, RAM, GPU), recommends an appropriate model tier, and walks you through downloading and configuring everything step-by-step — including the text embedding model.
2 Recommended Models
Vision Models — for Ollama
| Model | Pull Command | Size | Best For |
|---|---|---|---|
granite3.2-vision:2b ⭐ |
ollama pull granite3.2-vision:2b |
3.8 GB | Recommended default — best speed/quality balance |
granite3.2-vision:latest |
ollama pull granite3.2-vision:latest |
4.9 GB | Full-precision; highest quality output |
gemma4:e2b |
ollama pull gemma4:e2b |
3.8 GB | Google Gemma 4; excellent instruction following |
gemma4:e4b |
ollama pull gemma4:e4b |
5.2 GB | Higher capacity; very good for quality scoring |
Quick Setup (Recommended Path)
# Download the recommended vision model
ollama pull granite3.2-vision:2b
# Download the recommended text embedding model
ollama pull nomic-embed-text
# Verify installation
ollama list
Testing Models In-App
- In Settings → AI Engine, click Fetch Models to refresh the model list.
- Select your vision model from the dropdown.
- Click Test Connection — the app sends a small test image and displays the raw JSON response. A healthy response contains
description_short,tags,objects,mood, andqualitykeys. - For text embeddings, click Test Embedding. A green checkmark confirms a valid embedding vector was returned.
3 Set Your Library Source
On first launch you will be prompted to add a Library Source — the root folder where your photos live.
- Go to Settings → Library → Photo Sources.
- Click Add Source and select your main photos folder (e.g.,
/Users/you/PicturesorD:\Photos). - Add multiple sources if needed (e.g., an external drive alongside your main library).
- Click Save.
Choose the highest-level folder that contains all your photos. The Discoverer scans recursively, so you do not need to add every sub-folder.
4 Import Photos
If you want to copy photos from a camera, iPhone, ZIP archive, or another folder into your managed library, use the Smart Importer:
- Open Tools (left sidebar accordion) → Smart Photo Importer.
- Choose your Import Source: Local Directory, iPhone (USB), or ZIP Archive (Google Takeout, iCloud export).
- Choose a Filter Mode: All Photos, Since Last Import, or Since Custom Date.
- Optionally check Stage in Curation Queue to preview and approve photos before they enter the main library.
- Click Preview — review item count, total size, date range, and thumbnails.
- Click Start Import.
Photos are organized as YEAR/YYYY_MM_DD/filename.ext in your master library folder. Duplicates are automatically detected and skipped by perceptual hash.
For a deep dive into incremental import modes, background workers, status check APIs, and how it links to the AI pipeline, read the Importing Workflow Tutorial.
5 Run the AI Processing Sequence
Once photos are in a library source folder, start the AI processing pipeline. Click Start AI Processing Sequence in the top toolbar (the ▶ play button).
| Step | Worker | What It Does |
|---|---|---|
| 1 | Discovery | Scans source folders, extracts EXIF metadata, registers new photos in the database. |
| 2 | Processing | Generates 300 px grid thumbnails and 2048 px preview proxies; computes pHash. |
| 3 | AI Analysis | Sends each photo to the vision LLM for descriptions, tags, mood, and categorization. |
| 4 | Quality Analysis | Scores technical image quality — sharpness, focus, grain, white balance, contrast, composition. |
| 5 | Semantic Prep | Generates text embeddings from AI descriptions for natural language search. |
| 6 | Visual Similarity | Computes CLIP embeddings and updates the 3D cluster coordinate map. |
You can browse and use the app normally while this runs — the UI never blocks. Each step can also be triggered independently from the Tools accordion panel.
6 Explore & Filter Your Library
The Library View is your primary workspace. Photos appear in reverse-chronological order by Date Taken. Thumbnails load asynchronously — the grid is scrollable immediately, even on very large libraries.
Timeline Rail (Left Sidebar)
Click any year to jump the grid to that year instantly. Expand a year to reveal months. Each entry shows the photo count for that period.
Filter Panel
| Filter Category | Options |
|---|---|
| Date Range | From / To date pickers |
| Star Rating | Show only starred / unstarred / all |
| Camera | Filter to a specific camera body (from EXIF) |
| Format | HEIC · JPG · PNG · MP4 · MOV · RAW · etc. |
| GPS | Only photos with / without location data |
| Mood | Joyful · Serene · Dramatic · Melancholic · etc. |
| Objects / Places / Actions | Filter by AI-detected content |
| Quality Tier | High / Medium / Low (from AI quality scoring) |
| Quality Sliders | Fine-grained thresholds: sharpness, focus, grain, white balance, contrast, composition |
Active filters appear as badge chips above the grid. All filters stack with AND logic. Click any badge to remove that filter.
Search
| Mode | How It Works |
|---|---|
| Keyword | Matches filenames, dates, camera models, and AI-extracted tags. |
| Semantic | Type a concept in natural language — e.g., "family dinner at a restaurant" — and the app finds photos by meaning using vector similarity. Requires Semantic Prep to have completed. |
7 Open a Photo in Detail View
Click any photo thumbnail to open the Detail View. Navigate with ← → arrow keys or the on-screen navigation buttons.
| Section | Contents |
|---|---|
| Main Image | Full-resolution preview; scroll wheel to zoom, drag to pan. |
| EXIF & Technical | Camera body, lens, aperture, shutter speed, ISO, focal length, GPS coordinates. |
| AI Description | Long-form narrative description written by the vision LLM. |
| AI Tags | Objects · Places · Actions · Mood · Category — all filterable. |
| Quality Scores | Sharpness · Focus · Low Grain · White Balance · Contrast · Composition — each 0–100 with visual bars. |
| People | Detected faces with identity labels; click a face to jump to the People View. |
| Rating & Labels | Set star rating (1–5), toggle favorite flag, add custom text tags. |
| Collections | Add this photo to one or more named collections. |
To learn more about virtual collections, chronological grouping with the Trip Builder, quality sorting, and exporting/sharing your curated sets, see the Collections & Curation Tutorial.
What to Explore Next
| Goal | Where to Go |
|---|---|
| Explore photos by location | Map View (globe icon in the toolbar) |
| Explore visual similarity | 3D Cluster View (cube icon) |
| Review and name identified people | People View (person icon) |
| Identify and remove low-quality shots | Tools → Photo Quality Sorter |
| Export a collection of photos | Tools → Export Photos |
| Build a shareable photo website | Tools → Website Builder |
| Back up your library to Google Drive | Tools → Cloud Backup |
| Check AI processing status and history | Tools → Activity History |
Troubleshooting Quick Reference
| Symptom | Where to Look / What to Try |
|---|---|
| Photos do not appear after adding source | Run Discovery from Tools, then check ~/.AegisPhotoVoyager/logs/discoverer.log |
| AI analysis is stuck or not progressing | Check ~/.AegisPhotoVoyager/logs/ollama.log; confirm Ollama is running with curl http://localhost:11434/api/tags |
| "Model not found" error | Run ollama list and ensure the model name in Settings matches exactly (including tag, e.g., :2b) |
| Semantic search returns no results | Ensure Semantic Prep has run; check ~/.AegisPhotoVoyager/logs/text_embeddings.log |
| Face scan shows no people | Confirm face_recognition is installed: pip install face_recognition face_recognition_models |
| Application crashes on launch | Check ~/.AegisPhotoVoyager/logs/launcher.log and faulthandler.log |